11/14 42-4 [BS] Tables
배운 그리드 적용해서 표 2개씩 한 행에 배치 할 거..
1. Basic Table 와 Striped Rows
Basic Table : table태그에 클래스명으로 table 지정하여 표 만듦.
Striped Rows : 기본 표의 행에 번갈아가며 색 입힘 table table-Striped
  <div class="row">
            <div class="col-md-6">   <!--그리드 적용 !!-->
              <h2>Basic Table </h2>
                <table class="table">
                    <thead>
                      <tr>
                        <th>Firstname</th>
                        <th>Lastname</th>
                        <th>Email</th>
                      </tr>
                    </thead>
                    <tbody>
                      <tr>
                        <td>John</td>
                        <td>Doe</td>
                        <td>john@example.com</td>
                      </tr>
                      <tr>
                        <td>Mary</td>
                        <td>Moe</td>
                        <td>mary@example.com</td>
                      </tr>
                      <tr>
                        <td>July</td>
                        <td>Dooley</td>
                        <td>july@example.com</td>
                      </tr>
                    </tbody>
                  </table>
            </div>
        <!--   <div class="col-md-2"></div>   col - md 5 해도 됨 !-->
            <div class="col-md-6">
              <h2>Striped Rows</h2>
                <table class="table table-striped"> <!--기본 table을 지우면 안됨-->
                    <thead>
                      <tr>
                        <th>Firstname</th>
                        <th>Lastname</th>
                        <th>Email</th>
                      </tr>
                    </thead>
                    <tbody>
                      <tr>
                        <td>John</td>
                        <td>Doe</td>
                        <td>john@example.com</td>
                      </tr>
                      <tr>
                        <td>Mary</td>
                        <td>Moe</td>
                        <td>mary@example.com</td>
                      </tr>
                      <tr>
                        <td>July</td>
                        <td>Dooley</td>
                        <td>july@example.com</td>
                      </tr>
                    </tbody>
                  </table>
            </div><!---col-->
          </div> <!--row-->
2.Bordered Table 과 Hover Rows
Bordered Table : 표에 테두리 그어줌 table table-Bordered
Hover Rows : 표의 행에 마우스를 올렸을 때 색이 입혀 짐 (선택할 행을 구분하기 쉽게 해줌) table table-hover
  <div class="row">
              <div class="col-md-6">   <!--그리드 적용 !!-->
                <h2>Bordered Table</h2>
                  <table class="table table-bordered">
                      <thead>
                        <tr>
                          <th>Firstname</th>
                          <th>Lastname</th>
                          <th>Email</th>
                        </tr>
                      </thead>
                      <tbody>
                        <tr>
                          <td>John</td>
                          <td>Doe</td>
                          <td>john@example.com</td>
                        </tr>
                        <tr>
                          <td>Mary</td>
                          <td>Moe</td>
                          <td>mary@example.com</td>
                        </tr>
                        <tr>
                          <td>July</td>
                          <td>Dooley</td>
                          <td>july@example.com</td>
                        </tr>
                      </tbody>
                    </table>
              </div>

              <div class="col-md-6">
                <h2>Hover Rows</h2>
                  <table class="table table-hover"> <!--hover색은 내가 바꿔도 됨-->
                      <thead>
                        <tr>
                          <th>Firstname</th>
                          <th>Lastname</th>
                          <th>Email</th>
                        </tr>
                      </thead>
                      <tbody>
                        <tr>
                          <td>John</td>
                          <td>Doe</td>
                          <td>john@example.com</td>
                        </tr>
                        <tr>
                          <td>Mary</td>
                          <td>Moe</td>
                          <td>mary@example.com</td>
                        </tr>
                        <tr>
                          <td>July</td>
                          <td>Dooley</td>
                          <td>july@example.com</td>
                        </tr>
                      </tbody>
                    </table>
              </div><!---col-->
            </div> <!--row-->
3.Black/Dark Table 과 Dark Striped Table (테이블 태그에 지정 !) : 둘 다 어두운 계열 색의 표임 색 차이는 예시보면서 ...
table table-dark
table table-dark table-striped
<div class="row">
                  <div class="col-md-6">
                    <h2>Black/Dark Table</h2>
                      <table class="table table-bordered table-dark">
                          <thead>
                            <tr>
                              <th>Firstname</th>
                              <th>Lastname</th>
                              <th>Email</th>
                            </tr>
                          </thead>
                          <tbody>
                            <tr>
                              <td>John</td>
                              <td>Doe</td>
                              <td>john@example.com</td>
                            </tr>
                            <tr>
                              <td>Mary</td>
                              <td>Moe</td>
                              <td>mary@example.com</td>
                            </tr>
                            <tr>
                              <td>July</td>
                              <td>Dooley</td>
                              <td>july@example.com</td>
                            </tr>
                          </tbody>
                        </table>
                  </div>

                  <div class="col-md-6">
                    <h2>Dark Striped Table</h2>
                      <table class="table table-dark table-striped">
                          <thead>
                            <tr>
                              <th>Firstname</th>
                              <th>Lastname</th>
                              <th>Email</th>
                            </tr>
                          </thead>
                          <tbody>
                            <tr>
                              <td>John</td>
                              <td>Doe</td>
                              <td>john@example.com</td>
                            </tr>
                            <tr>
                              <td>Mary</td>
                              <td>Moe</td>
                              <td>mary@example.com</td>
                            </tr>
                            <tr>
                              <td>July</td>
                              <td>Dooley</td>
                              <td>july@example.com</td>
                            </tr>
                          </tbody>
                        </table>
                  </div><!---col-->
                </div> <!--row-->
4.Hoverable Dark Table 과 Borderless Table (table태그에 지정)
Hoverable Dark Table : dark Table에 hover 입힌거 table table-dark table-hober
Borderless Table : 테두리 없애기 table table-borderless
 <div class="row">
     <div class="col-md-6">
         <h2>Hoverable Dark Table</h2>
         <table class="table table-bordered table-dark table-hover">
             <thead>
                 <tr>
                    <th>Firstname</th>
                    <th>Lastname</th>
                    <th>Email</th>
                 </tr>
             </thead>
             <tbody>
                 <tr>
                    <td>John</td>
                    <td>Doe</td>
                    <td>john@example.com</td>
                 </tr>
                 <tr>
                    <td>Mary</td>
                    <td>Moe</td>
                    <td>mary@example.com</td>
                 </tr>
                 <tr>
                    <td>July</td>
                    <td>Dooley</td>
                    <td>july@example.com</td>
                 </tr>
             </tbody>
           </table>
        </div>

        <div class="col-md-6">
           <h2>Borderless Table</h2>
           <table class="table table-borderless"> <!--기본 table을 지우면 안됨-->
              <thead>
                 <tr>
                     <th>Firstname</th>
                     <th>Lastname</th>
                     <th>Email</th>
                 </tr>
              </thead>
              <tbody>
                  <tr>
                      <td>John</td>
                      <td>Doe</td>
                      <td>john@example.com</td>
                   </tr>
                   <tr>
                       <td>Mary</td>
                       <td>Moe</td>
                       <td>mary@example.com</td>
                    </tr>
                    <tr>
                        <td>July</td>
                        <td>Dooley</td>
                        <td>july@example.com</td>
                    </tr>
                </tbody>
             </table>
          </div><!---col-->
     </div> <!--row-->
5.Contextual Classes 와 Table Head Colors : 특정 구간만을 선택하여 따로 설정이 가능함
Table Head Colors: class="thead-색깔명" 을 <thead>의 하위태그 <tr>에 적용한다 !!!
<div class="row">
                  <div class="col-md">
                    <h2>Contextual Classes</h2>
                    <table class="table table-dark table-bordered ">
                      <thead >
                        <tr >
                          <th>Firstname</th>
                          <th>Lastname</th>
                          <th>Email</th>
                        </tr>
                      </thead>
                      <tbody>
                        <tr  >
                          <td>Default</td>
                          <td>Defaultson</td>
                          <td>def@somemail.com</td>
                        </tr>
                             <!--tr 에 적용한게 td보다 우선적용!!!  -->
                        <tr class="table-primary">
                          <td>Primary</td>
                          <td>Joe</td>
                          <td class="table-danger">joe@example.com</td>   <!--tr 에 적용한거 있어서 무시 됨  -->
                        </tr>
                        <tr class="table-success">
                          <td>Success</td>
                          <td>Doe</td>
                          <td >john@example.com</td>
                        </tr>
                        <tr>
                          <td>Danger</td>
                          <td>Moe</td>
                          <td class="table-danger">mary@example.com</td>
                        </tr>
                        <tr >
                          <td>Info</td>
                          <td>Dooley</td>
                          <td>july@example.com</td>
                        </tr>
                        <tr >
                          <td>Warning</td>
                          <td>Refs</td>
                          <td>bo@example.com</td>
                        </tr>
                        <tr>
                          <td>Active</td>
                          <td>Activeson</td>
                          <td>act@example.com</td>
                        </tr>
                        <tr >
                          <td>Secondary</td>
                          <td>Secondson</td>
                          <td>sec@example.com</td>
                        </tr>
                        <tr >
                          <td>Light</td>
                          <td>Angie</td>
                          <td>angie@example.com</td>
                        </tr>
                        <tr>
                          <td>Dark</td>
                          <td>Bo</td>
                          <td>bo@example.com</td>
                        </tr>
                      </tbody>
                    </table>
                  </div>


                  <div class="col-md">
                    <h2>Table Head Colors</h2>
                    <table class="table">
                      <thead  >
                        <tr class="thead-dark" >
                          <th>Firstname</th>
                          <th>Lastname</th>
                          <th>Email</th>
                        </tr>
                      </thead>
                      <tbody>
                        <tr  >
                          <td>Default</td>
                          <td>Defaultson</td>
                          <td>def@somemail.com</td>
                        </tr>
                        <tr >
                          <td>Primary</td>
                          <td>Joe</td>
                          <td>joe@example.com</td>
                        </tr>
                        <tr>
                          <td>Success</td>
                          <td>Doe</td>
                          <td >john@example.com</td>
                        </tr>
                        <tr>
                          <td>Danger</td>
                          <td>Moe</td>
                          <td>mary@example.com</td>
                        </tr>
                        <tr >
                          <td>Info</td>
                          <td>Dooley</td>
                          <td>july@example.com</td>
                        </tr>
                        <tr >
                          <td>Warning</td>
                          <td>Refs</td>
                          <td>bo@example.com</td>
                        </tr>
                        <tr>
                          <td>Active</td>
                          <td>Activeson</td>
                          <td>act@example.com</td>
                        </tr>
                        <tr >
                          <td>Secondary</td>
                          <td>Secondson</td>
                          <td>sec@example.com</td>
                        </tr>
                        <tr >
                          <td>Light</td>
                          <td>Angie</td>
                          <td>angie@example.com</td>
                        </tr>
                        <tr>
                          <td>Dark</td>
                          <td>Bo</td>
                          <td>bo@example.com</td>
                        </tr>
                      </tbody>
                    </table>
                  </div>
6. Small Table : 표 간격을 작게 만든다 ! table table-sm
 <div class="row">
                <div class="col-md">
                  <h2>Not Small Table</h2>
                  <table class="table table-bordered">
                    <thead>
                      <tr>
                        <th>Firstname</th>
                        <th>Lastname</th>
                        <th>Email</th>
                      </tr>
                    </thead>
                    <tbody>
                      <tr>
                        <td>John</td>
                        <td>Doe</td>
                        <td>john@example.com</td>
                      </tr>
                      <tr>
                        <td>Mary</td>
                        <td>Moe</td>
                        <td>mary@example.com</td>
                      </tr>
                      <tr>
                        <td>July</td>
                        <td>Dooley</td>
                        <td>july@example.com</td>
                      </tr>
                    </tbody>
                  </table>
                </div>

                <div class="col-md">
                  <h2>Small Table</h2>
                  <table class="table table-bordered table-sm">
                    <thead>
                      <tr>
                        <th>Firstname</th>
                        <th>Lastname</th>
                        <th>Email</th>
                      </tr>
                    </thead>
                    <tbody>
                      <tr>
                        <td>John</td>
                        <td>Doe</td>
                        <td>john@example.com</td>
                      </tr>
                      <tr>
                        <td>Mary</td>
                        <td>Moe</td>
                        <td>mary@example.com</td>
                      </tr>
                      <tr>
                        <td>July</td>
                        <td>Dooley</td>
                        <td>july@example.com</td>
                      </tr>
                    </tbody>
                  </table>
                </div>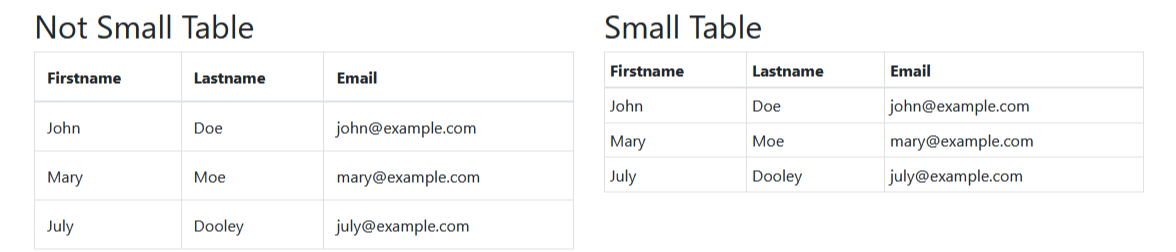
7. 반응형 테이블
해상도에 따라 스크롤바 크기가 달라짐!
class=" " 요안에 다 넣을 수 있는데 그거마다도 크기가 다 달라져!!! div(row,col)에 넣어도 되고 table에 넣어도 됨 !!
table-responsive
 <div class="row table-responsive">
                <div class="col">
                  <h2> Responsive Table </h2>
                  <table class="table table-bordered">
                    <thead>
                      <tr>
                        <th>#</th>
                        <th>Firstname</th>
                        <th>Lastname</th>
                        <th>Age</th>
                        <th>City</th>
                        <th>Country</th>
                        <th>Sex</th>
                        <th>Example</th>
                        <th>Example</th>
                        <th>Example</th>
                        <th>Example</th>
                        <th>Example</th>
                        <th>Example</th>
                        <th>Example</th>
                        <th>Example</th>
                        <th>Example</th>
                        <th>Example</th>
                        <th>Example</th>
                        <th>Example</th>
                      </tr>
                    </thead>
                    <tbody>
                      <tr>
                        <td>1</td>
                        <td>Anna</td>
                        <td>Pitt</td>
                        <td>35</td>
                        <td>New York</td>
                        <td>USA</td>
                        <td>Female</td>
                        <td>Yes</td>
                        <td>Yes</td>
                        <td>Yes</td>
                        <td>Yes</td>
                        <td>Yes</td>
                        <td>Yes</td>
                        <td>Yes</td>
                        <td>Yes</td>
                        <td>Yes</td>
                        <td>Yes</td>
                        <td>Yes</td>
                        <td>Yes</td>
                      </tr>
                    </tbody>
                  </table>
                </div>
              </div>

